Thursday, February 27, 2014

Ginger Bread Waffles


I am a long time lover of breakfast. I love slow mornings that start with a good breakfast and hot coffee. I also start these mornings with blasting a really happy record to get me excited and ready for the day. I love when we have guests over and I get to spoil them in the morning! There is just something so nice waking up and cooking for the ones you love. Plus, there is nothing better than waking up to the smell of waffles.


Ginger Bread Waffle

4 eggs
1 cup molasses
1 cup buttermilk
3 cups flour
2 teaspoons ground ginger
1 1/4 teaspoons cinnamon
1 teaspoon ground cloves
3/4 teaspoon salt
2 teaspoon baking soda
2 teaspoons baking powder
1/2 cup butter, melted
Maple syrup

Start by beating eggs until light and fluffy, add the sugar, molasses and buttermilk and mix until smooth about 1 min. In a separate bowl, sift together flour, spices, salt, baking soda, and baking powder. Add the dry mix to the egg mix, stir together when smooth add butter. Cooks in the waffle maker 2-4 min, makes 14 waffles!

Recipe from Spoonful


I don't know about you but I am getting a little tired of the cold and snow, these pretty flowers have helped me see the light at the end of the tunnel.  SPRING will be here... soonish, or at least that's what we are hoping for here in Minnesota. But for now we have these tasty waffles to cheer us up.


Happy breakfast time!

-Bethany

Friday, February 21, 2014

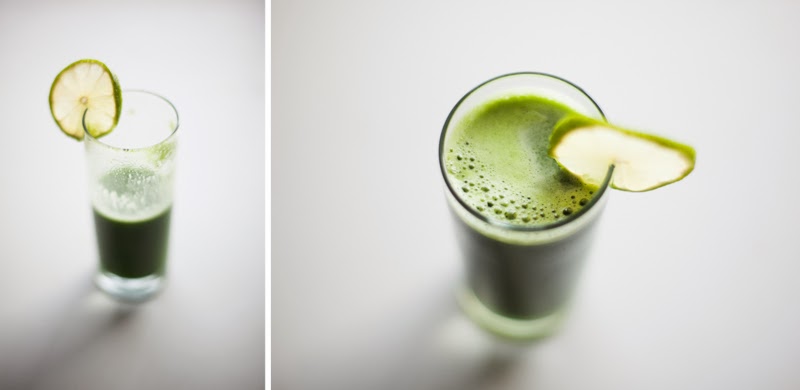
Juice!


I will be the first to admit that I was a little skeptical to juicing at first. My brother did a juice fast last year for 25 days and he lost 30 pounds; I thought that just did not sound fun. But then recently, I watched the documentary "Fat, sick and nearly dead" and it really opened up my eyes to how great raw juice is for you. 

I have been using my moms juicer for the past month, but I have been doing some research and you can get a really great juicer for a decent price. They range from about $30 to $250, I would say for everyday use you should go with a juicer that would last you long time, but if you are like me and would like to make juice a few times a week then something in the $50-$100 range might be a better choice. Like the NutriBullet  by Magic Bullet, I just got one of these, the major difference is with the NutriBullet it just blends everything all together instead of just pulling the juice from the produce. It is a bit of a different taste, but still just as good for you, if not better because you are getting all the fiber. 

I have really enjoyed this new adventure I have taken with food; it is completely different then anything I have ever done before and I feel great! I love it! The juice tastes great, refreshing and I feel healthier already, plus I am getting more fruit and vegetables in my diet than ever before.


OH! SNAP! dis.juice.be.straight.up.delicious.

2 Apples
1/2 Lemon
1/2 Lime
1 Cucumber 
4 Stalks of kale
Sliver of ginger

Cut the apples into wedges and one by one put them through the juicer. Peel the lemon and lime before you run them through the juicer, the sliver of ginger really adds a nice flavor to each juice. I cut the cucumber into four decent chunks and I run the stalk of kale through the juicer one by one, leaf first. 


Here are some great benefits from the produce in this juice that are fantastic!!

Kale: Prevents bladder, breast, colon, ovary, and prostate cancer! It also is packed full of vitamins and minerals that boost cardiovascular health and detoxify the system.

Spinach: Reduces blood pressure, has the bone building molecule vitamin K.

The juice requires a lot of clean up everytime you're done,  It can be kinda a pain, but it takes less time than cooking a meal all together. On the plus side your house smells amazing after you juice! It smells like a farmers market!

Just imagine all the things you could juice in the summer with the freshest fruits and vegetables and if you purchase a CSA  share you would have awesome new recipes to try all summer! Win, win, win!

Have you ever made your own juice? How did it you like it? What are some of your favorite recipes? Please share them with us!!

Love
-Bethany

Friday, February 14, 2014

Swedish Meatballs


To say my grandma Lois was one hell of a cook is a huge understatement.  She was the queen of traditional Scandinavian cuisine, the master of everything Betty Crocker, and a frugal and inventive farm wife.  


Like any strong Lutheran lady, my grandma could whip up a hotdish on a moments notice, bake dozens of bars in an afternoon, and roll lefse with her eyes closed.  Every year my grandmother's small church would serve hundreds and hundreds of people for a lutefisk and Swedish meatball feed. People would come from hours away for Lois Carlson's famous meatballs.  My grandma would proudly and humbly work a small kitchen of volunteers for several days and through shifts of meals.  As time went on my grandmother gave up heading-up this grand meal but she never stopped making Swedish meatballs for our family.  

I had forgotten how involved my grandmother was in this production until recently when my dad emailed me the recipe for her Swedish meatballs-- there were three versions of the recipe by the amount that they served, enough to feed 12, 50, or 100.  We usually have Swedish meatballs on Christmas Eve but this recipe is so easy and delicious that I it can be enjoyed at any time of year, especially to warm your homes these last few weeks (months) of winter.  So from her table to yours, I give you Lois' famous Swedish meatballs. 


Lois' Swedish Meatballs

2 lbs ground beef
1/2 lb pork sausage
1 cup bread crumbs
2 eggs
2 1/2 tsp salt
1/2 tsp ground ginger
1/2 Tbls allspice
1 cup milk
12 Tbls minced onion
4 tsp sugar
1 tsp nutmeg

Gravy
1/4 cup flour
1/4 cup warm water
1 can of cream of mushroom soup (optional)

In a large bowl, mix together all ingredients with your hands.  Form the mixture into one to two inch balls. Pan fry the meatballs over medium heat, turning through out.  You can cover the pan to speed up the cooking process but make sure to brown all sides of the meatballs.  Cook for about 10 minutes or until no longer pink in the middle.  Remove the meatballs from the pan and keep warm either in a slow cooker or low temperature oven. Increase the heat of the drippings to medium-high.

In an air tight container, combine flour and water, shake and combine until dissolved and frothy.  Heat the drippings until bubbling, slowly and continually whisk in the flour and water mixture until the gravy is dark and thickened.  If you would like to stretch the gravy to make extra you can add a desired amount of cream of mushroom soup after the gravy is made.  Pour gravy generously over meatballs.  ENJOY!
                                   

Beth and I enjoyed our meatballs with more comfort food-- garlic mashed baby reds and pan fried zucchini! Pair that with a nice stout and you have yourself a lovely winter meal!


Bethany and I have never been huge fans of Valentine's Day but my grandma was.  She saw it as an excuse to eat chocolate and spoil the ones you loved.  So, in honor of Lois, Bethany and I wish you and yours the happiest and most heartfelt Valentine's Day.

Much love and cooking-

Whit

Monday, February 10, 2014

Sweet Heart Coffee Cake


So I can't lie that I am not the biggest fan of Valentines Day because I think you should show the same amount of love to a person day in and day out. I think it's stupid how much pressure people put on one night out on the town. Wouldn't it be much more romantic to bake this yummy coffee cake and snuggle up with a pot of coffee and just spend time talking and doing "other" things... 

But however you and your honey decide to spend Valentines Day we hope that above all you are happy in celebrating the love and spark that you share, that makes your relationship unique and beautiful.

/////////////////

Let's get bakin'.

I must warn you this bread is pretty labor intensive, so prepare yourself to make this when you have lots of time on your hands. 

Sweet Heart Coffee Cake

2 cups of sour cream
2 pkgs dry yeast
1/2 cup warm water
1/4 cup softened butter
1/3 cup sugar
2 tsp salt
2 eggs
6 cups flour
1 1/2 cups finely chopped California dried apricots
1 1/2 cups chopped maraschino cherries

Icing

2 cups powered sugar
2 Tbls water


STEPS 1-12

STEP 1: Heat sour cream until luke warm.


STEP 2: Dissolve yeast in warm water in a large bowl

STEP 3: Stir in sour cream, butter, sugar, eggs, salt and 2 cups of flour. Mix in enough flour so the dough is easy to handle (no sticky dough).

STEP 4: Knead on floured board for about ten minutes. (I have a Kitchen Aid, so this process is much easier on my end. I use the dough hook.)


STEP 5: Place kneaded dough in a greased bowl, greased side up. Cover and let rise for an hour. After an hour the dough should have doubled in size.

STEP 6: Heat oven to 375 degrees.


STEP 7: Punch down dough (literally punch the middle of the dough on your flour filled surface.) Divide into three equal parts.

STEP 8: Roll each part into a rectangle roughly 15x6 inches. Place on parchment paper on a baking sheet.


STEP 9: With scissors make 2 inch long cuts at 1/2 inch intervals on both sides of the rectangle.


STEP 10: In a food processor combine the apricots and cherries, blend until the mixture is in small chunks. Spread 1/3 of the mixture on the center of the dough and crisscross the strips over the filling, stretch the dough to 22 inches. Repeat with the remaining balls of dough and filling.  Shape pieces into a heart.


STEP 11: Bake for 15-20 minutes until golden brown,

STEP 12: Brush with melted butter while warm, drizzle on icing (mix powdered sugar and water until desired consistency), and decorate with cherries.

This bread is so good and if you have basic baking ingredients won't cost you much to make!

Have the best Valentines Day!

Love,
Bethany


Wednesday, February 5, 2014

Baked Potato for One

There are so many great things about being single.  Here is my quick Top 10 of the best things about flying solo! 

10. No stupid fights.  I never get in a fight with myself because generally, I like all the things I do. 
9. Being so damn lazy and not feeling embarrassed about it because no one has to know except my cats. 
8. I'm no longer "that girl" who only talks about her boyfriend/girlfriend/fiance.  I get to be this girl, who is funny and cool. 
7. No one is hogging the blanket at night and I can sleep like a starfish. 
6. I don't have to share my cats affection with anyone else. Yes, I said it. 
5. Personal hygiene on Sundays is optional. 
4. Dating and all of the wild, awful, wonderful, and surprising moments and people that come along with it.  
3. Doing the things I want to do. I get to watch my favorite shows and movies, go to my favorite restaurants, and listen to my favorite music without anyone's approval or disapproval.  
2. I only have to impress one set of family and friends and because I share DNA with half of them, it isn't that hard.  
1. The endless possibilities.  

The one thing I do hate about being single is cooking for myself.  I love to cook and sharing food with people is something I enjoy more than anything in the world.  It can be really hard to find the time and energy to cook something.  I also struggle with portions as it can be difficult to make just enough for one.  So the easier and smaller the recipe, the better! Luckily, Bethany turned me on to to this simple potato recipe. 

Much love and cooking!
-Whitney


This is an easy way to have a meal for one, when you just want something simple. It does just take a little longer than a normal meal, but it is super tasty and really cheap!

Baked Potato for One

1 red potato
1/4 cup shredded cheddar cheese
2-3 Tbls melted butter
2-3 tsps chopped fresh herbs
Dollop of sour cream

Preheat oven to 425 degrees. Cut the potato in thin slices about half way through, place potato in a baking dish, pour melted butter over the top, sprinkle with herbs, and bake for about 50 minutes. Take out, sprinkle with cheese, bake for another 15 minutes. Add sour cream and eat, eat, eat!


Have fun!

-Bethany


Monday, February 3, 2014

Kale Chips

So recently, I have been on a health kick! I am trying to gain better control of what I eat and drink as I was noticing that my body was just feeling so gross. I know it's from me not listening to what it needed. I don't really eat fast food or have a problem with eating too much, it is just more that I'm not eating enough raw foods such as veggies, fruits, and nuts. I also drink a lot of beer (I love craft beer) and I can definitely feel it in my gut. Eewww. 

So, last week I challenged myself to a five day juice fast! It was awesome; I felt great and refreshed. I only drank juice that I made with veggies and fruit! I bought a lot of kale and used it as the base in most of my juice because after all, kale is a super food! It is jam packed full of nutrients and keeps you full!  I have always wanted to try kale chips and I finally did! The result was awesome! I really enjoy them! If you are a big chip lover and you are trying to be healthy these could be really great for you.  They are crunchy and full of flavor. I will definitely be buying more kale instead of chips from now on, plus they are SO easy to make!


KALE CHIPS

1 bundle of kale
2 Tbls olive oil
1 Tbls Italian seasoning
Salt & pepper to taste

Rinse and dry the kale.  Pull the kale apart from the stem and place in a big bowl. Add the olive oil, Italian seasoning, salt, and pepper. Toss until all the leaves are covered. Place on a baking sheet and bake at 300 degrees for 15 minutes.


I am making it a goal to have a healthy 2014, I am looking forward to sharing some of my favorite recipes I come across as the year goes on. I believe that having a healthy heart will not only make you live longer, but make you happier everyday! Who's with me?


Let us know what you think of kale chips! Are they a firm yes or a hard no for your nightly snack of choice?

Love,
Bethany